We have the domain name added to the new Office365 tenant successfully. Along with that, DNS records are also updated/adjusted. However, That's not enough to resume the mail flow. Once the tenant is added to the Office365 tenant, Exchange Online Protection, which is the email gateway enabled with various security controls can start processing inbound emails. However, The emails will not get delivered as the SMTP address is yet to be added to respective mailbox users. Hence, the next activity which should be done immediately is to add the smtp address of your organization and make it as the primary address. In my test tenant, I need my test users to have @activedirectory.in email address added and make it primary.
As a best practice, UPN should be matching the primary SMTP. Hence, both UPN and primary address needs to be adjusted first.
With UPN and email address changes, Mail flow should fully resume. With in Office365 tenants, Maiflow will be resumed in 15-30 minutes usually. External email services will also resume after this.
Teams External users
Gust users can be invited at this stage. This should be done manually as PowerShell commandlet does not support adding external users to team or team channel. At the time of writing this post, The only two option availalbe for the switch role is Member and Owner.
Export Calendar/Contact/Tasks
If calendar/contacts/tasks are exported as a final sync, use import option in Outlook to import the same PST.
Rearranging Mailbox Folders
If PST Import was used, the folders imported will be residing in a different folder structure. However, Don't Panic.
1. Moving subfolders with in standard folders - Use Outlook in Online Mode. Move subfolders first. Dont use Copy. Eg for a subfolder is Inbox\Customer1. This movement is easy and will be quick.
2. Items inside standard folders - Use Outlook in Online Mode. Move items in a group of 5K items per move. Again, Don't COPY PASTE. This is due to the fact that Outlook movement may fail some time. if we opt for Copy-Paste, we need to be sure on which all mails got copied. Else, Mails will get duplicated. Standard folders are Inbox, Sent Items, Drafts, Deleted Items, Archive, Junk Box etc which are created by O365 at the time of provisioning.
3. Moving non standard folders on Root. Use Outlook in Online mode. Move each folder at a time. Use Online Mode and movement will be quick.
Once movement is completed, We also need to clear off the folder structure created as part of the PST Import. This should be done through Outlook Web Access. Delete the root of imported folders and then go to Deleted Items to clear it off from Deleted Items too.
LegacyExchangeDN
Stamp LegacyExchangeDN used at source mailbox as X500 address - Stamp LegacyExchangeDN and stamp as X500 attribute .
With that, We are good to handover user credentials. Make sure that users has FAQ documents on how to configure Outlook, Mobile etc after roll out. So prepare one in details and share with the end users in advance. Ask them to keep a print out.
This is my last post on this series. Hope it was helpful.
Good luck !
posts on office365 cross tenant migration
GoDaddy Office365 to Microsoft Office365 Migration- Part 1
Before we get ready for the cut over, This is an important question to be clarified. Once we have the data syncronized, the final step is to cut over the smtp domain from GoDaddy tenant to Microsoft Tenant. However, Its not as easy as what we think. GoDaddy has a different setup of Office365 which doesnt have Office365 admin center. Admin center is replaced by GoDaddy admin center which has very limited options.
Challenge - GoDaddy tenant needs an admin account which is created using the GoDaddy admin center. And we dont have an option to create a user with default onmicrosoft.com ID here. As a prerequisite for deleting the domain name from Office365 tenant, Its mandatory that all recipients who are using this domain name must delete them prior to the removal. This is like a dead lock. We need to change the SMTP domain, however retain the admin access too.
If thats the case, We should have an additional SMTP domain to be used in interim. All accounts needs to have SMTP address changed from activedirectory.in to interimdomainname.in so that we can retain the users as well as the data on GoDaddy tenant even after cut over.
If an interim domain is not an option - then the only option is to delete all the user objects from GoDaddy admin center and call GoDaddy Support requesting them to drop the tenant.
Deleting Domain
Once the smtp domain has released from recipients, We can call GoDaddy support or use PowerShell to remove the domain from GoDaddy Office365 Tenant.
Use Connect-MsolService to connect with Microsoft Online Service
Use Remove-MSOLDomain to delete the domain


We can also use Get-MSOLUser -Domain yourdomain.com to identify the objects which are currently using the domain name (even as a secondary SMTP address)
Once Domain Deletion is successful, Please give 15 minutes to 30 minuets before re adding the domain on Microsoft tenant.
For adding the domain, Login to Portal using https://admin.microsoft.com.
Navigate to Settings -> Domain
Click on + Add Domain
The next step is to verify the ownership. This can happen using different options. With few of the DNS service providers, Microsoft O365 service can connect directly using the admin credentials of DNS service provider and validate. The other option, which was used from the early days is by creating a dns record, however will need some time for the DNS records to be available for O365 services. Hence, the preferred option is to connect directly and validate.
I was using GoDaddy as my DNS provider for activedirectory.in. Hence, I am getting a prompt to connect with GoDaddy and verify the ownership.
Once Domain Ownership gets successfully verified, Click on Done.
The next part is updating DNS recrods. This page will appear once we click on DOne on the previous page. Here we need to choose the services we are availing and the corresponding DNS records will be displayed.
Here also, DNS Connect option will help us to make the DNS update jobs easy. Just connect with the admin credentials and all DNS records will get created in one shot.
Once DNS records are created, validation will recheck if everything is good. This could also take some time for DNS records to replicate. Once validation is successfull, We are good to go ahead and start using this domain in the Microsoft Tenant.
posts on office365 cross tenant migration
GoDaddy Office365 to Microsoft Office365 Migration- Part 1
Office365CrossTenantMigration - Get ready for the cut over
The next step is to get ready for a cut over. On a high level, cut over involves the below activities.
1. Disabling access for all users on existing tenant, including external users
2. Remove all users from all collabration spaces, including external users
3. Perform the final data sync for SharePoint as well as Email
4. Remove the SMTP domain name from all recipients
5. Remove the domain activedirectory.in from GoDaddy tenant
6. Add the domain activedirectory.in to the target Microsoft Tenant
7. Update DNS records
8. Update the UPN/Primary SMTP address of all users
9. Wait for DNS replication to resume inbound mail flow
10. Update the old legacyexchangeDN as x500 address for each user on target tenant
11. Handover the credentials for users to start connecting with the new tenant
12. Add the external users back to Team/Team Channels so that they will receive a new invitation to join the new teams hosted on target tenant
As a preparetion to cut over activities, We should do the below activities
1. Access to DNS service provider to update the DNS records
2. Reduce the TTL value of potential records which may get changed. In this specific case of GoDaddy O365 to Microsoft O365 cross tenant migration, MX and many other records remains unchanged as the MX record is pointed as a cname generated based on the domain name. For example, MX record for activedirectory.in domain will be "activedirectory-in.mail.protection.outlook.com" and will remain the same even if you move the domain from one tenant to another.
3. User Communication - Its important to keep the users aware about the upcoming migration and how should they connect to the new tenant once cut over is done.
4. External User Communication - Its also important to let the external users know about this migration as the teams URLs or SharePoint online URLs will get changed.
5. How to communicate new password to the end users as we cannot use email at this stage
6. Enable channels for getting a support from Microsoft or DNS service provider in the event of any unforeseen delay or issues during the cut over window
Ideally, Detaching the domain from GoDaddy and adding it back to the target tenant will be completed in 30 minutes. However, it all depends on lot many external factors and give sufficient room while making the cut over plan.
Cut over Schedule
The best time to start the cut over activities is on Friday late night after 11pm local time. If users from multiple timezone are involved, consider the users who are crossing 11pm local time at last.
A sample cut over schedule will be as below.
11 PM Friday - Start Cutover
11.30 PM Friday - Remove users from Teams/Teams Channels
00.00 AM Saturday - Reset the password
00.30 AM Saturday - Perform final sync with respective tools
08.00 AM Saturday - Remove SMTP Address from all recipients
10.00 AM Saturday - Remove SMTP domain from GoDaddy
12.00 PM Saturday - Add SMTP domain to Microsoft Tenant
1.00 PM Saturday - Update UPN/SMTP of target users with original domain name
2.00 PM Saturday - Validate internal/external mail flow
3.00 PM Saturday - Handover the credentials
The plan and schedule will vary based on each environment and hence you should prepare a similar one considering all different aspects of your migration.
posts on office365 cross tenant migration
GoDaddy Office365 to Microsoft Office365 Migration- Part 1
Now lets look at different options on migrating emails from source tenant to destination tenant. With free tools, The best option available is Cross tenant Mailbox Migrator. Though I haven't worked on this as its a pretty new tool, I feel this is going to be a life saver.
Cross Tenant Mailbox migrator migrated entire mailbox from Source to Destination mailbox and provide some level of co-existence even if we go with staged migration. Once a mailbox is migrated, Source mailbox will be converted to a mail enabled user with email address pointing to the target onmicrosoft smtp.
Pros
Its migrating directly from Source mailbox to destination. So no need to worry about data confidentiality
Complete mailbox migration, including calendar, contacts and tasks
Co-existence so that migration team has more flexibility to take mailboxes migration in multiple batches
Cons
Cross Tenant Mailbox migrator is still in public preview
Configuration is not a cake walk. Needs very complex configuration on source tenant as well as target tenant.
Configurations are complex as its done through few scripts provided by Microsoft.
Scripts cannot be edited as its has a check to validate if its the same file on GitHub
Lack of documentation
While executing scripts, Migration team needs to pass few variables. However, If we end up in any error, Its difficult to understand why its failing from the error message
I have tried setting up Cross Tenant Mailbox Migrator on my lab but was not successful. But I will keep on trying. I also hope that as Cross Tenant Mailbox Migrator is getting into general availability, We should see more documentation and better user experience to reduce the complex configurations.
Migrating Emails- IMAP
IMAP migration is the next available option. However, There are few points to be considered for IMAP migration.
Microsoft's data migration tool is currently unaware of tools enforcing messaging records management (MRM) or archival policies. Because of this, any messages that are deleted or moved to archive by these policies will result in the migration process flagging these items as "missing". The result is perceived data loss rather than actual data loss, which makes it much harder to identify actual data loss during any content verification checks.
Therefore, Microsoft strongly recommends disabling all MRM and archival policies before attempting any data migration to mailboxes.
You can only migrate items in a user's inbox or other mail folders. This type of migration doesn't migrate contacts, calendar items, or tasks.
You can migrate a maximum of 500,000 items from a user's mailbox (emails are migrated from newest to oldest).
The biggest email you can migrate is 35 MB.
If you limited the connections to your source email system, it's a good idea to increase them to improve migration performance. Common connection limits include client/server total connections, per-user connections, and IP address connections on either the server or the firewall.
Challenges on the ground
Migration team needs to have password of each users for configuring IMAP sync
Even if we reset the password on cutover day, The total time for Migration and Cutover will be limited
Calendars, Contacts and Tasks needs to be handled separately. Either PST Export or let users take their own backups in PST
Lacking any kind of log files or reports to validate what data
Configuring IMAP Migration
IMAP Connector should be configured in the target tenant. Login to the Office365 Admin portal using an Admin Account.
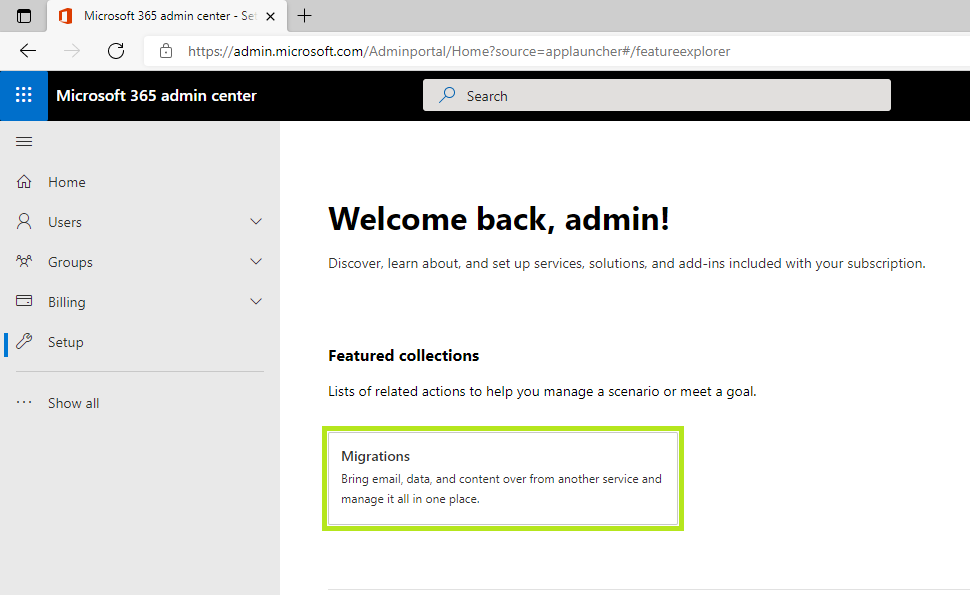
Navigate to Setup -> Migrations
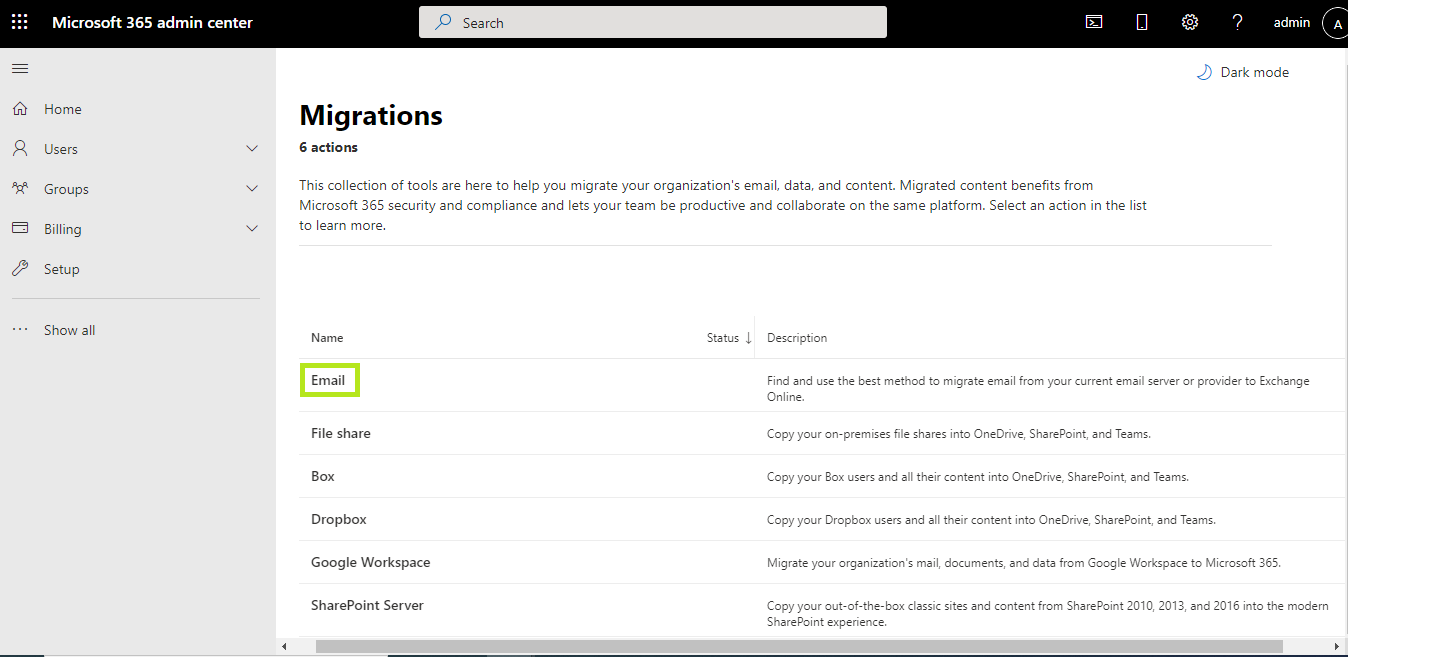
Select Email from Migrations page
Click on "Get Started" from Migrate your email page
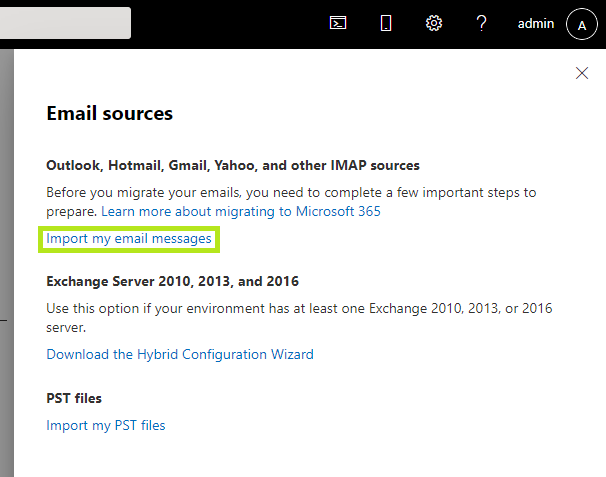
Click on "Import my email messages" from Outlook, Hotmail, Gmail, Yahoo and other IMAP sources
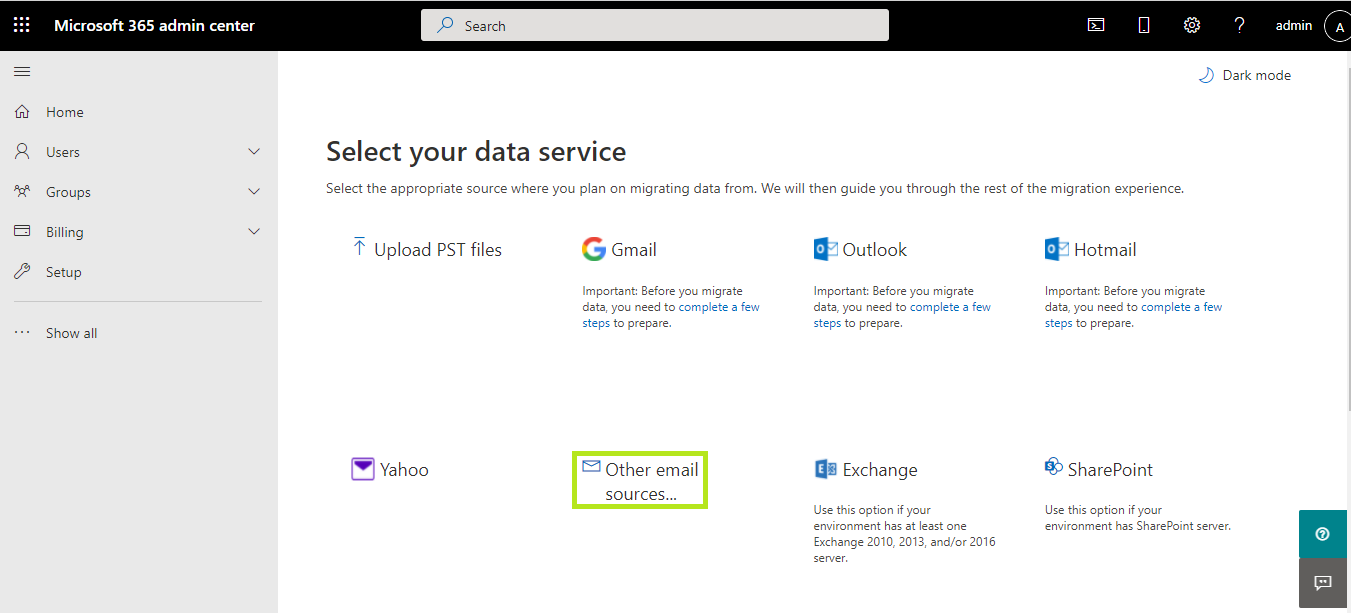
Select "Other email Sources" as the data service source
Fill in the IMAP server name, Port, SSL/TLS, Admin user name and Password of the source tenant and click on Save
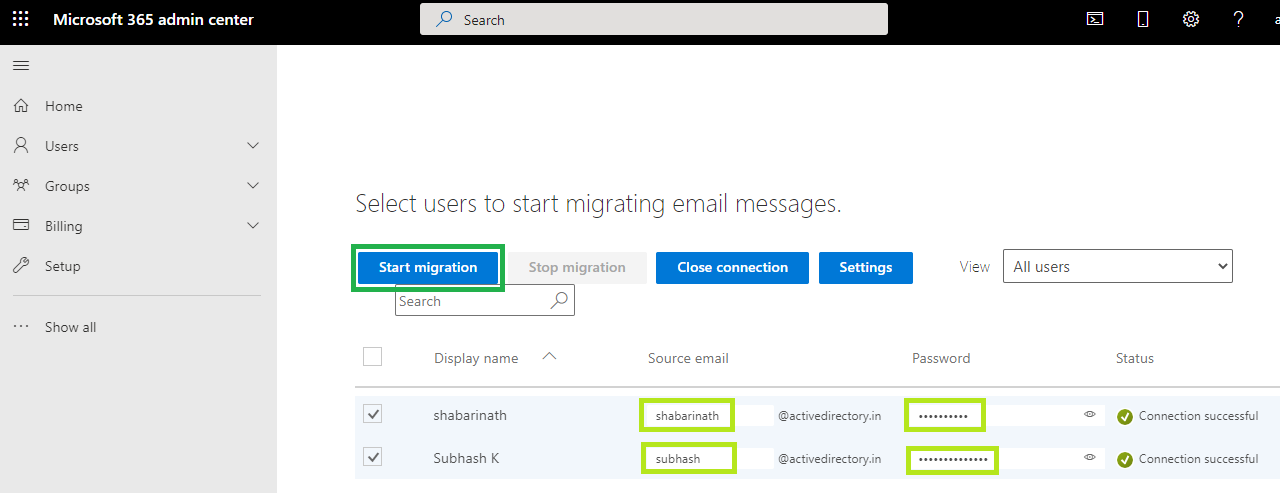
Once the initial connection gets established, A new page with the display name of the target mailboxes will be displayed. Here, the idea is to pair the source mailboxes and target mailboxes. Key in the source user id. Domain name will be listed and cannot be edited. On the password box, Key the in password of respective user in source domain.
Once moved to the next line, connectivity will get established and can see the status if its successful.
Once all user mapping is completed, Click on Start Migratino button.
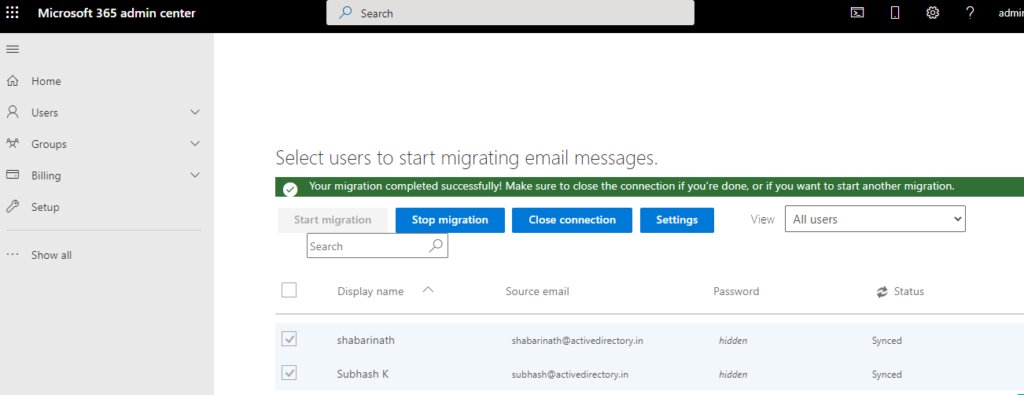
Once migration jobs get initiated, the status will be changed to syncing and can see a message on the top ribbon that "Your migration is in progress"
Once the migration is completed, Status will be changed to synced. Once all users on the list is successful, A message on the top ribbon will appear stating that "Your migration completed successfully"
Once migration is successful, Go ahead with "Close Connection" button to take the next batch of mailboxes. Repeat the same step for next set of users.
PST Export and Import
With out using any third party tools, The next option is to export PSTs and Import PSTs. Both can be done from Office365. However, This option is workable only smaller organizations. Because PST Export and Import needs time and difficult to complete in a short span of time. However, If we are ready to take some more risk and is flexible enough to go with loosing minor cosmetic stuffs, We can accommodate that too. Lets have a look in detail on how we can achieve this.
Lets looks at the sequence on high level. For explaining it, I am using shabarinath@activedirectory.in as my source mailbox in GoDaddy. And shabarinath@activedirectoryin.onmicrosoft.com as my target mailbox.
Create a job to export the entire mailbox of shabarinath@activedirectory.in and export the result as a single pst
For each export job, Create two Transport rule on the source tenant for each user
First Transport rule should be used to forward a copy as BCC of all mails for shabarinath@activedirectory.in to shabarinath@activedirectoryin.onmicrosoft.com
Second Transport rule should be used to forward a copy as BCC of all mails sent by shabarinath@activedirectory.in to shabarinath@activedirectoryin.onmicrosoft.com
Create an Outlook rule on the target mailbox - shabarinath@activedirectoryin.onmicrosoft.com. This rule is for adjusting the sent items. This rule needs to be deleted on the cutover day.
Outlook Rule should move emails from shabarinath@activedirectory.in to Sent Items. The rule is also capable to mark the email as read - But don't go for that. That needs Outlook to be on for processing the rule.
Now all new emails TO shabarinath@activedirectory.in or FROM shabarinath@activedirectory.in is also getting duplicated and getting delivered to the mailbox shabarinath@activedirectoryin.onmicrosoft.com which is on the target tenant.
Now Export the PST and Import the PSTs to target Office365 tenant using Network Upload
PST export and import jobs are something which can take few minutes to few days. Yes - We don't have any control other than looking at the progress. So PST export and import needs to be planned few days prior to the cutover date.
Once PST import is successful, Its the raw folder structure which will be available on target mailbox. Those who has worked on MFCMapi has an understanding on the raw structure.
So the next step is to move the restored data to the right folder.
Use Outlook in Online Mode for moving emails in Inbox, Sent Items, Junk, Deleted Items and Drafts (Default Folders)
Don't Copy-Paste. Always Move items to a different folder.
Any Non Default Folders, Its a cake walk. Just Move from one folder to another, which will happen in seconds irrespective of the items inside the folders.
Calendar, Contacts and Tasks will be visible but not defaulted to the one where user expect to see the data. Either use merge or do a final export of Calendar, Contacts and Tasks from source mailbox through Outlook on the cutover day. Import this back to the mailbox on the cutover day. An average PST with calendar, contacts and tasks may take 15 minutes if the size is not huge. So if more users needs to get migrated, Need more people to handle this activity in parallel on the cutover day.
Final Cleanup of Restored Folder Structure should be done from OWA. Delete first which will move the restored folder root to deleted items. And in the next step, Delete from Deleted Items. This is instant.
With that, We have both mailboxes with same content and same folder structure
What is the drawback of this approach?
Migration team needs to handled PSTs. PSTs are data which should be handled with care.
Multiple activities which needs to go in parallel. Some of the activates doesn't have any control other than triggering it
Mailbox is having the same data. However, the changes happening once the mail is getting delivered on the source mailbox will not get reflected on the target. Which means that users need to do the same task again after migration (Yes, That's the truth)
Exporting Calendar at the end from Outlook and Import back to the respective mailbox through Outlook will help to make the calendars updated inline with the source mailbox. If we choose to merge the calendar which came in through PST Import - Calendar is not updated and any changes after PST export happened will reflect on the target calendar.
I will try to have a follow-up post if Cross Tenant Mailbox configuration on my lab gets successful. Until that point, PST Export and Import is the easiest way. IMAP Migration is also recommended but needs to be sure if the IMAP migration limitations are not going to fire back..
posts on office365 cross tenant migration
Part 1
GoDaddy Office365 to Microsoft Office365 Migration- Part 1
By this time, We are ready with the below on the target tenant
User Objects
Teams
Teams Channels including Private Channels
M365 Groups
Standalone SharePoint Sites
Mover is a tool which can move the data from one SharePoint site to another SharePoint site. That means, We need to have both SharePoint sites available prior to the data movement. That's the logic behind sequencing the activities on target tenant so that all SharePoint sites, part of different services are getting created first without data.
How mover identify the source and target?
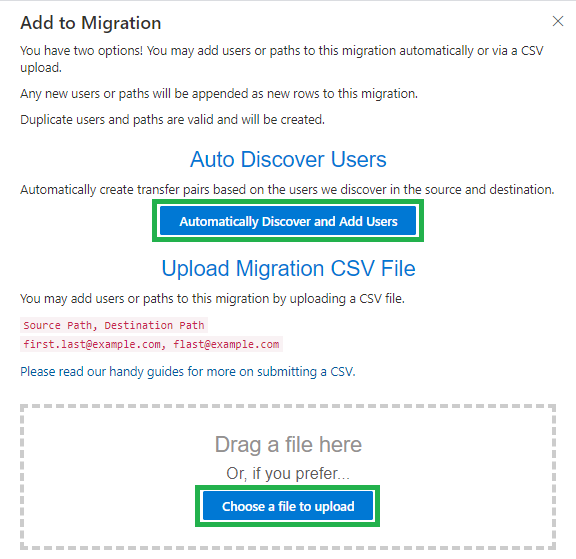
Mover has two options to add source/target pairs to migration console.
Auto Discovery
Manual CSV
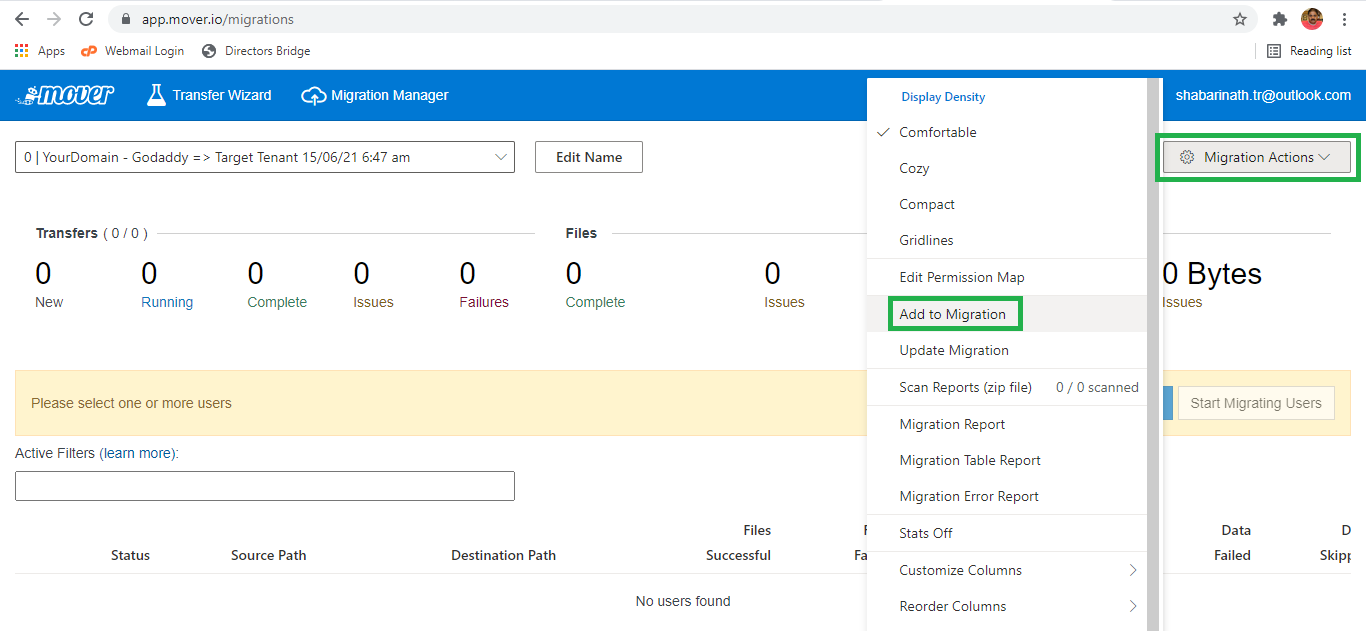
Navigate to Migration Manager drop down menu and click on "Add to Migration"
Add to Migration page will have both options listed.
In my experience, CSV upload is best so that we control the source and destination. The input file needs to be carefully made.
Guiding Principal on preparing an Input File
I am not a SharePoint expert to give a detailed writeup. However, I can help with the areas I am confident about.
Start with listing down the SharePoint sites into different categories
M365 Groups / Teams related SharePoint sites can be identified using the below one-liner
Get-SPOSite -Limit All -Template GROUP#0 |Select @{Label="SharedDocumentsURL"; Expression={$_.URL+"/Shared Documents"}} OR
OneDrive for business URLs can be identified from the below commandletGet-SPOSite -Limit All -IncludePersonalSite $true -Template SPSPERS#10
For OneDrive, Mover input file needs the UPN. for example Input File should have source as /shabarinath@activedirectory.in and destination as /shabarinath@activedirectoryin.onmicrosoft.com
Export the URL list for Source and Destination on each category
Use | select URL, Owner, Title to have a better visibility before exporting to CSV
Use |Export-Csv to export the details to CSV
By now, We have SharePoint URLs of both source tenant and target tenant with URL details. The next step is to do a manual matching between source and destination. Except OneDrive URLs, all URLs should be pointed to the document library. The one-liners are adjusting the URLs by appending "/Shared Documents" at the end. This is just based on an assumption and hence all the URLs needs to be validated by opening them.
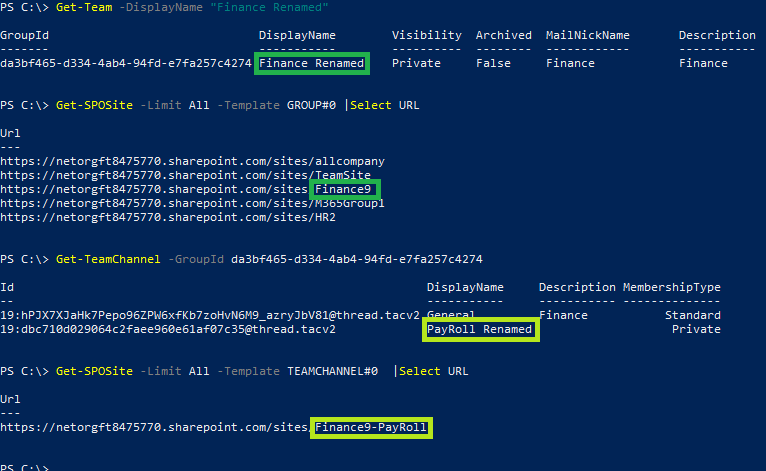
Another important point is matching the URLs in source and destination. Teams/Teams Channels can be renamed after creation. However, the SharePoint sites will remain with the original name used at the time of creation. So there is a chance that URLs in source tenant may not match with the destination if we do a straight comparison. This is happening because the teams/teams channels are getting created on the target tenant based on the current teams/teams channels. Hence, the SharePoint URLs will be based on the current Teams/Teams Channel display names. And we cannot use other attributes like mail nick name which will retain the original name, as users are only aware of the Teams/Teams Channels based on the display name which they are seeing on the teams client.
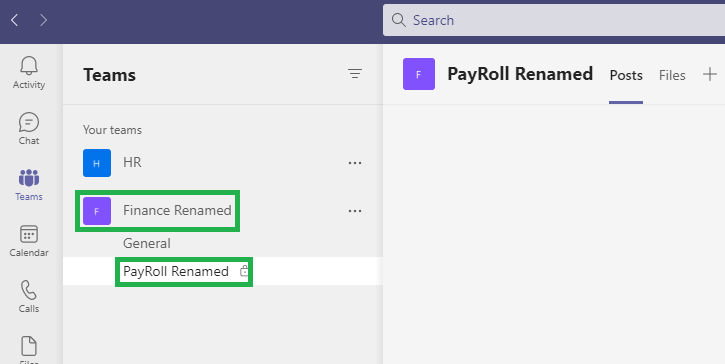
Refer this example to make this clear. We had a Team named Finance and a Private Channel named Payroll. Owner has renamed both as Finance Renamed and PayRoll Renamed. However, this change is only on the Display Name.
However on the target tenant, the URLs will be as Finance Renamed as the name used is source display name. On a similar note, Its not mandatory that SharePoint Site URL doesnt needs to be exactly
Hence, the URL pairs should be created with care and both URLs on each pair should be validated to be sure that its all good.
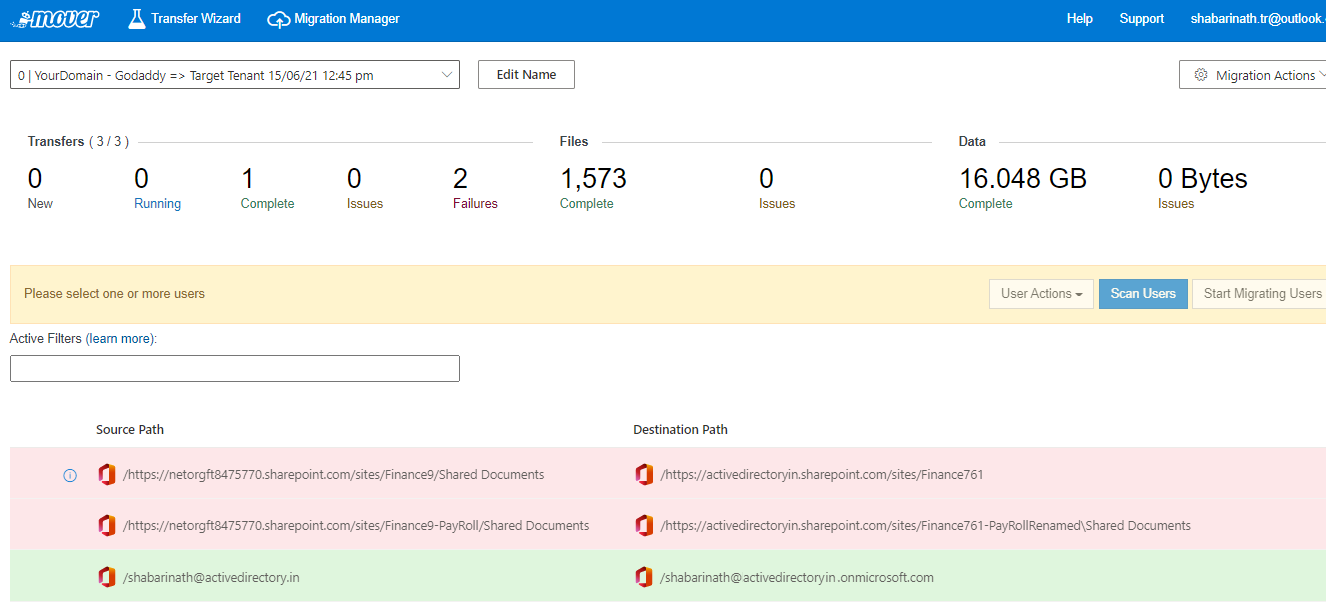
Now lets try to populate an input file and add to Mover. I am using an input file with incorrect URL to show how Mover will show the errors.
We can add the CSV file to Mover from Migration Options -> Add to migration option. Drag and drop the csv or use "Choose a file to Upload" button the upload the CSV.
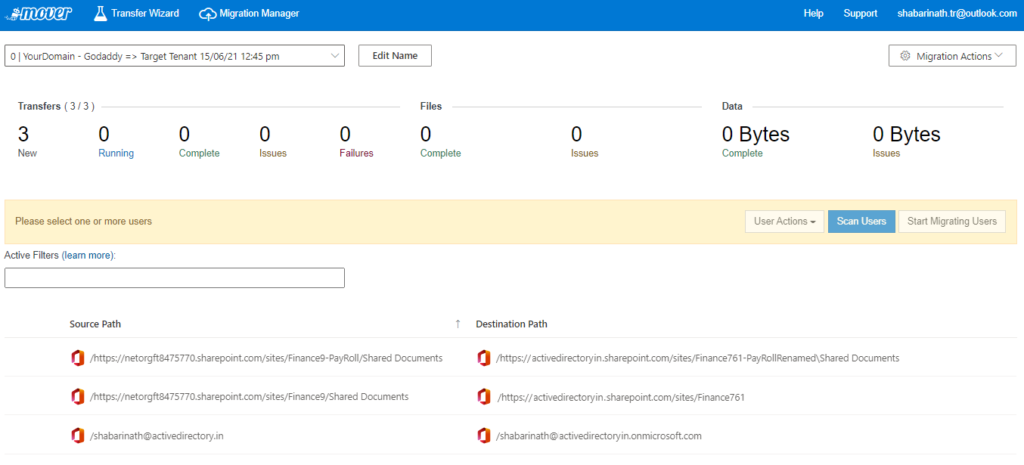
Mover load the input file successfully. There is no validation at this stage if the URLs are accessible or not.
Once the input file is successfully loaded on Mover console, Select all items or individual items and then initiate a scan by clicking at "Scan User". Scanning will look at the data on the source and populate the details on how many files, total volume of data etc.
Once scanning is successful, We can proceed with actual migration. Please note that migration can be started only for the items which scanning completed successfully.
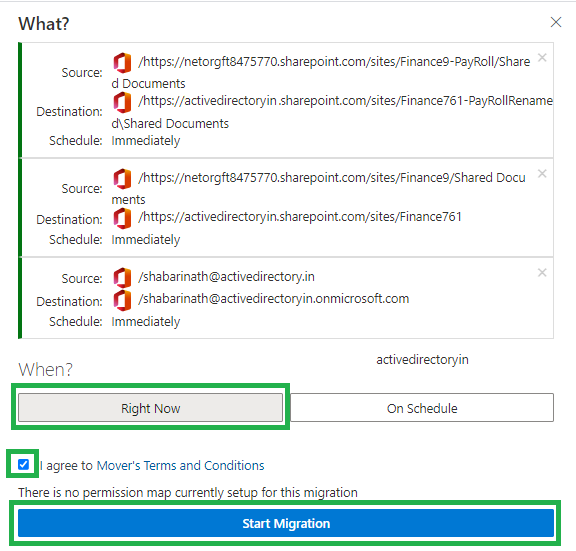
Once we click on Start Migration after accepting the Mover Terms and Conditions, It may take a while to start the job. The total time to complete the data transfer is based on the volume of data. And if the data is huge, It seems Microsoft has some kind of prioritization which can keep the jobs idle for few hours in between the data transfer progress. So give enough time for the data transfer job.
In the above sample, We have used an input file which has errors on the target SharePoint URL. Hence, the job failed at the time of migration.
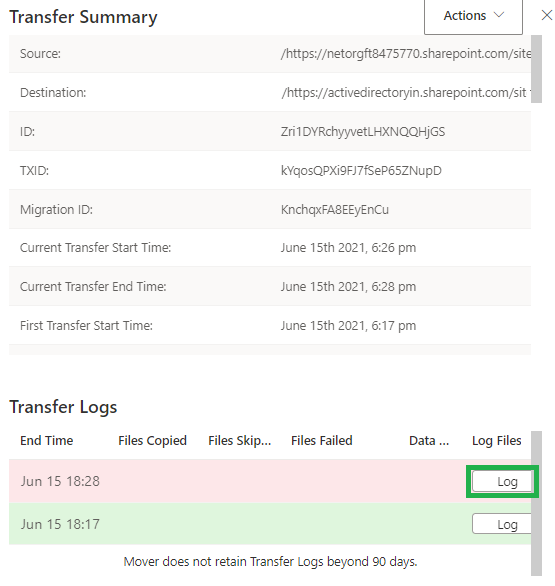
To view the detailed error, Double click on the item line which we need to verify.
Click on the Log to get more details on the error message.
Permission Mapping
In this migration, Data is copied along with metadata. However, user objects in source and destination are different from a technical standpoint as the UPNs are different at this stage. Hence, We need to relay on Mover to map the permissions with the respective user/group objects on the target side.
For example, I have an ID in my source tenant as shabarinath@activedirectory.in. I also have a user ID created in target tenant as shabarinath@activedirectoryin.onmicrosoft.com. Mover needs to know that permissions for shabarinath@activedirectory.in needs to be replaced with shabarinath@actiedirectoryin.onmicrosoft.com. By this way, Permissions are retained on the target tenant. On the cutover day, the domain activedirectory.in will be detached from Godaddy tenant and will be added to the target tenant. At this stage, We will update the UPN of users to @activedirectory.in . Since the UPN changes will not affect the permissions in Active Directory or Azure Active Directory, we are good with that approach.
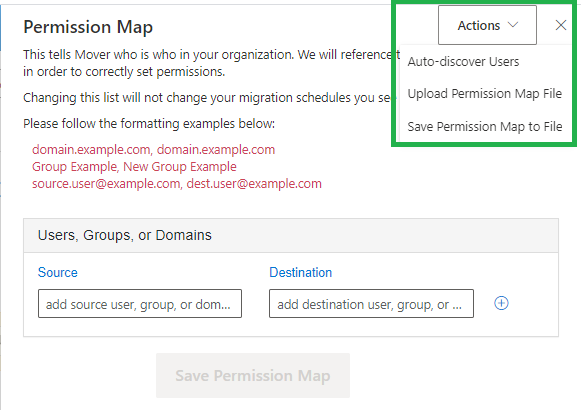
To map permission, Mover has two options. Either to use a mapping file or to do an auto discovery.
To Open Permission Map, Navigate to Migration Action -> Permission Map
Permission mapping will be blank while opening for the first time.
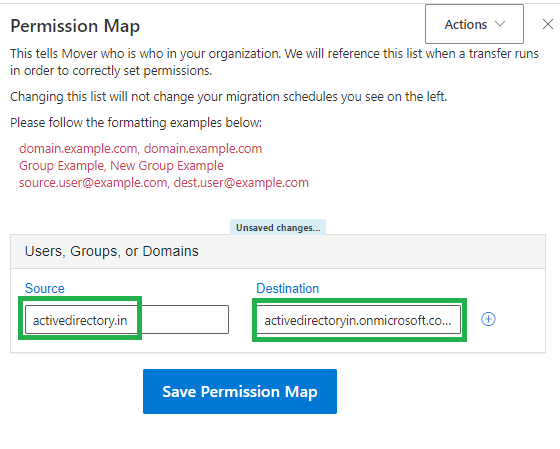
If object names are same and its just the domain name which are different - Adding a domain level mapping is enough in my experience. Else, Go for auto discovery and adjust the object pair prior to migration. For that, add source domain and destination domain (onmicrosoft.com domain). Click on the + symbol at the right next to the destination box.
Permission pair will be added to a new line and click on Save Permission Map button to save it.
Now, I have corrected the input file as below.
I have also updated the permission mapping. And initiated migration. Jobs completed successfully without errors.
Now, Its the time to start planning on the real data movement. As I told, majority of the user data will be in SharePoint Online, Teams or OneDrive. Teams is using SharePoint Document Library in the backend to store date. OneDrive is also using SharePoint personal site for storing user data. To help us with the data migration, Microsoft has provided a free tool named Mover. Mover can move files from different sources to SharePoint Online. And mover supports SharePoint Online to SharePoint Online file transfer. Its again copying of files from source sharepoint site to destination sharepoint site.
Why Mover?
Along with copying files/folders, Mover will also fix the permission accordingly after looking out for the corresponding users/groups in target tenant
Mover will retain the meta data of files and folders to a greater extend
Mover will retry failed files multiple times
Support custom input file which has a mapping of source SharePoint document library and destination document library
Mover is a SAAS based solution. So we dont need any additional infrastructure.
Configuring Mover
Prerequisites
Global Admin Access to both tenants
Microsoft live ID for Mover login
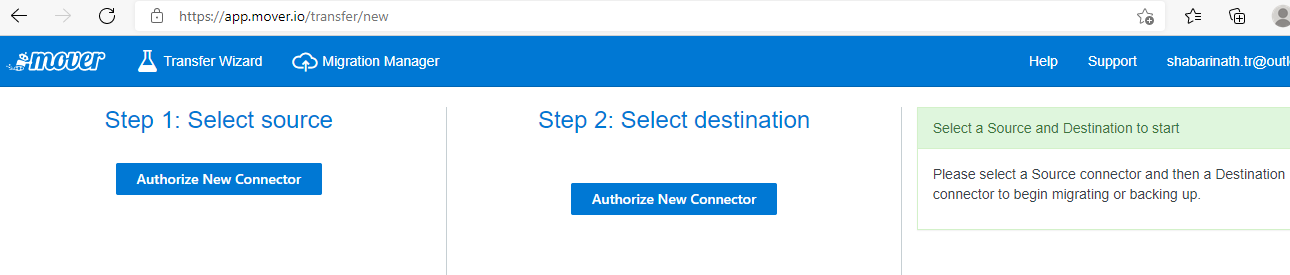
Login to Mover.io using a Microsoft account (live.com or hotmail.com)
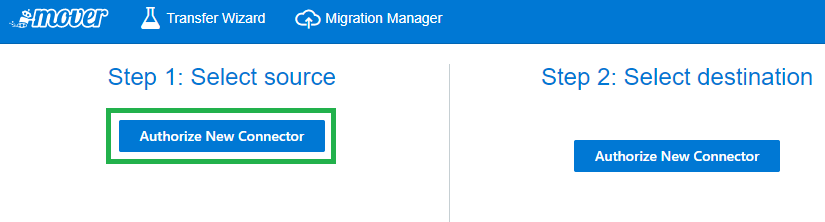
Click on Authorize New Connector from the Source section
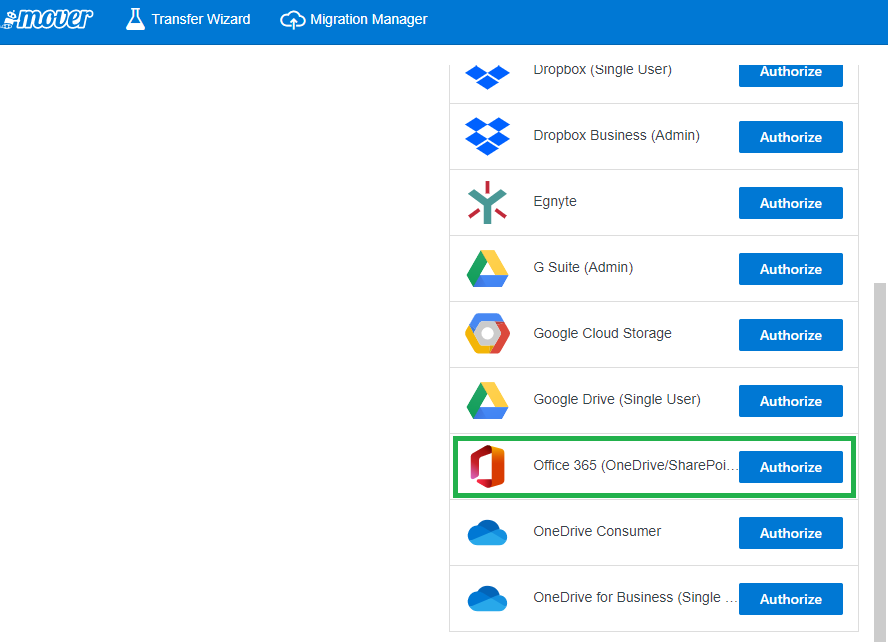
Choose Office365 (OneDrive/SharePoint Admin) from the list of Connectors
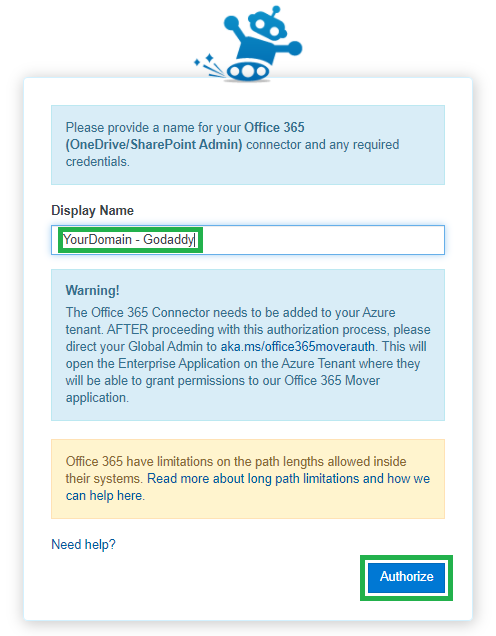
Name the connector - Use your domain name followed by hoster for easy identification and click on "Authorize"
A new Microsoft login page will come in. Use Global Admin Account to login.
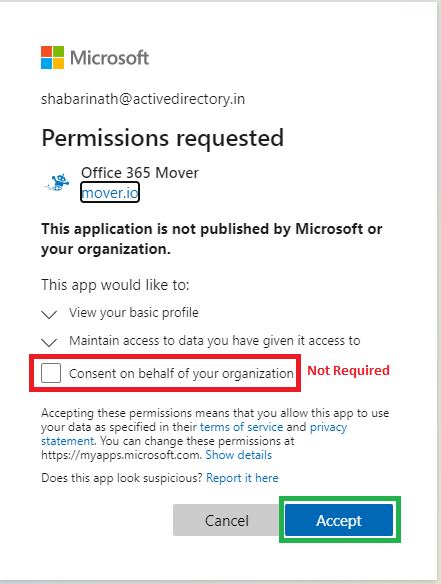
Post successful login, Screen will be prompted for granting consent. Dont select "Consent on behalf of your organization" check box. Click on Accept to proceed.
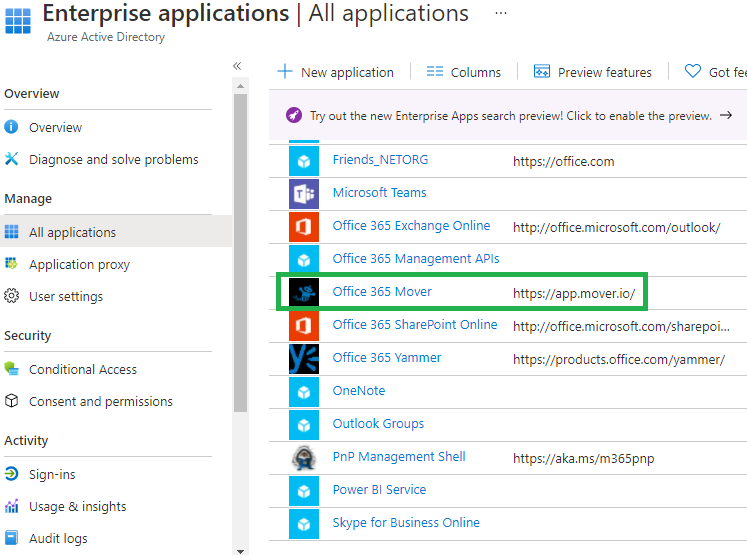
Navigate the Azure AD -> Enterprise Applications and select Office365 Mover
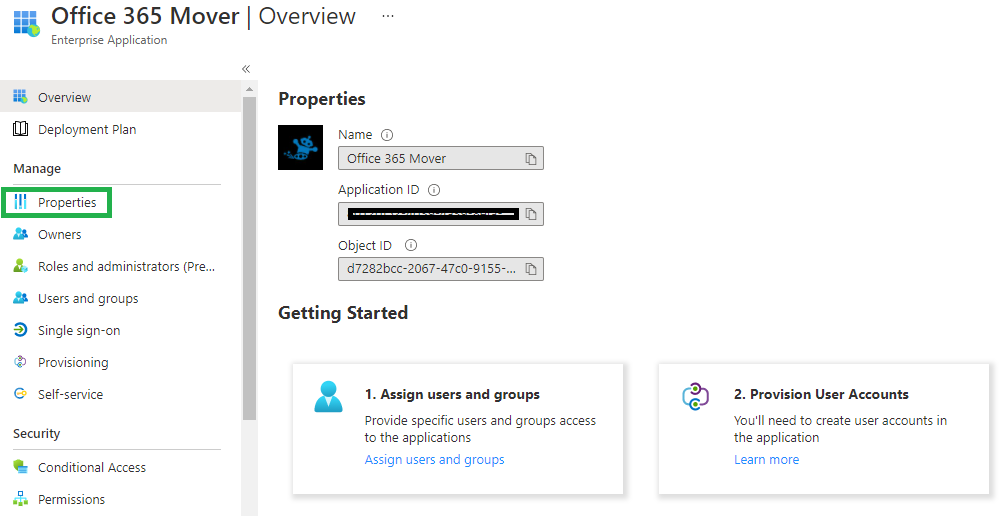
Click on Properties of "Office365 Mover" app
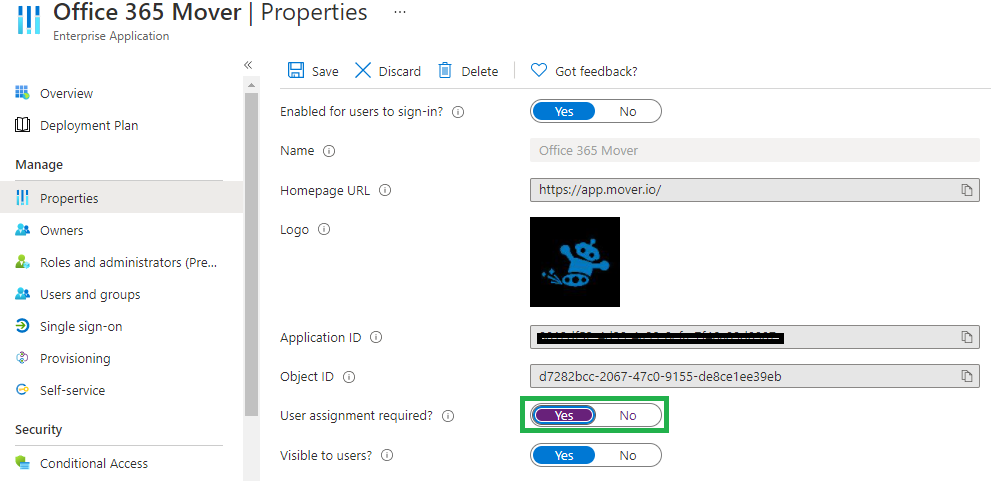
Change the slide of User Assignment Required from No to Yes and click on Save
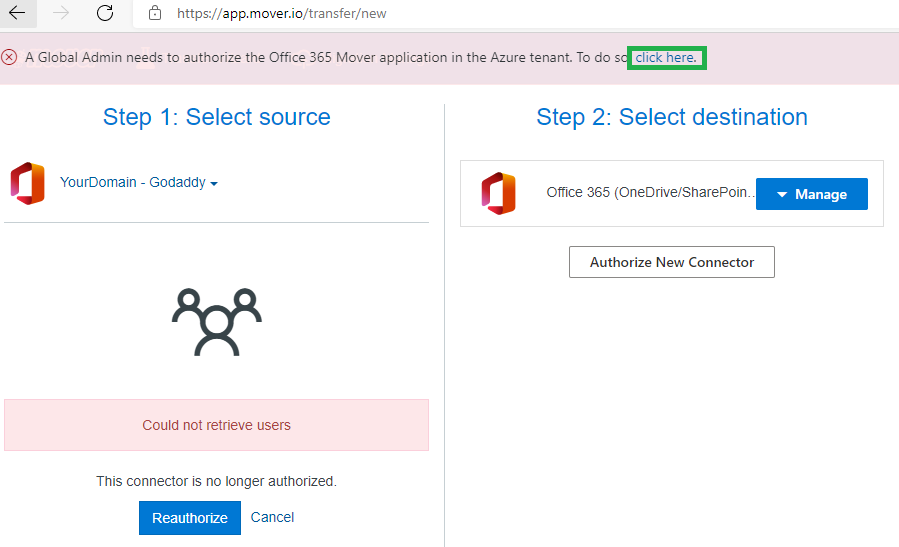
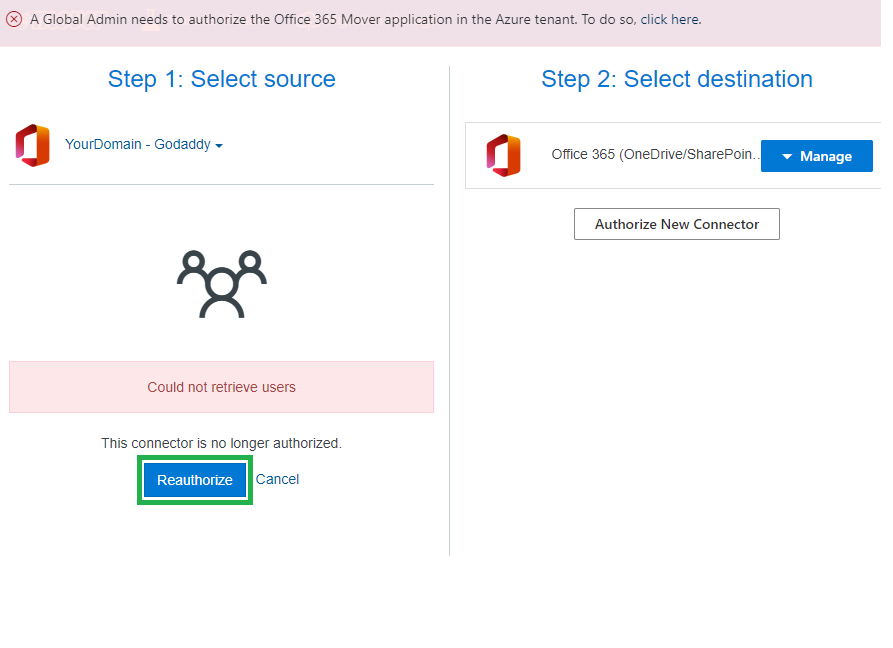
Switch back to Mover console. A new alert will be visible at top stating that Global Admin needs to authorize the access and will have a hyper link to authorize.
A new Microsoft login page will come in. Enter a Global Admin credentials and authenticate
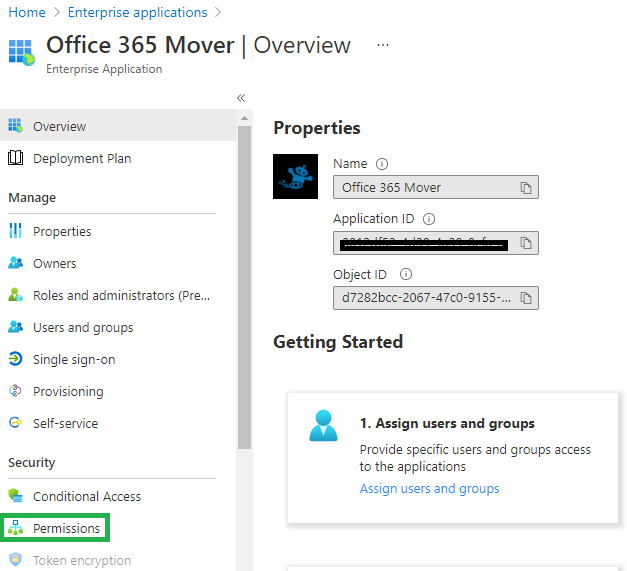
The page will be redirected to Azure AD -> Enterprise Applications -> Office365 Mover
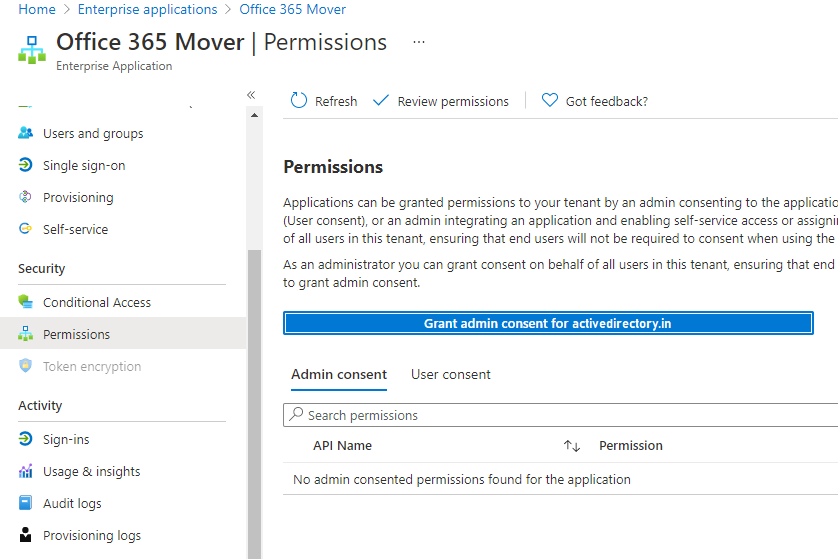
Click on Permissions
Click on "Grant Admin Consent for yourdomain.com"
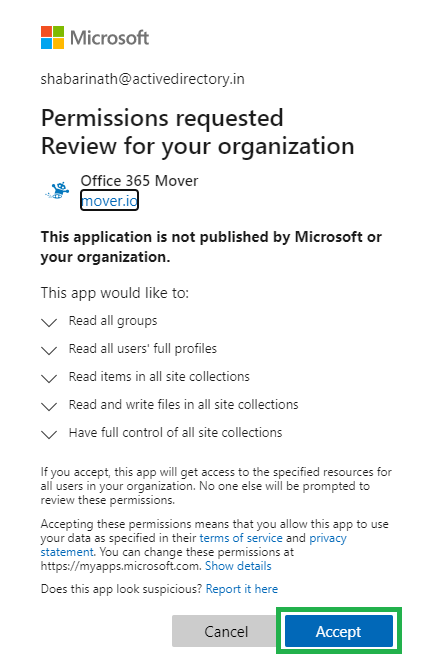
Admin Consent page will be prompted. Review the permissions and click on Accept
Go back to Mover Console. Now Click on Reauthorize the new connector
On a similar way, Authorize a new connector for the destination tenant too.
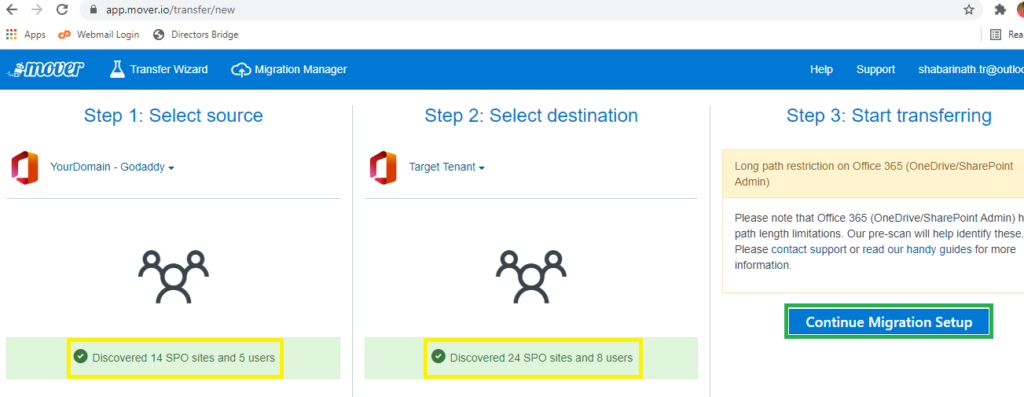
Once both connectors are good, Validate if mover is able to discover SPO sites on both tenants. If so, Click on "Continue Migration Setup"
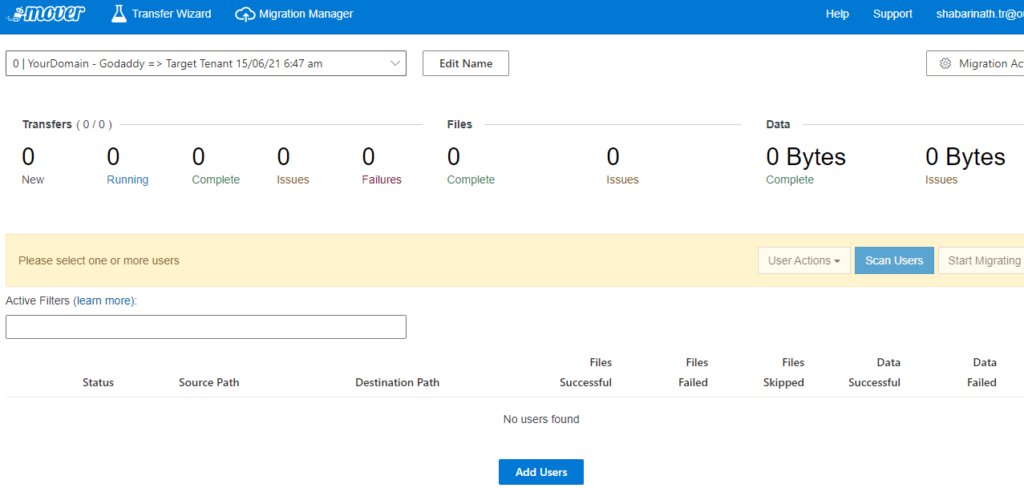
The page will redirected to "Migration Manger" console. Console will be blank and nothing to be worried on that.
With that, Mover is configured and good to start data transfer source and destination SharePoint sites.
The next step is to get the teams and teams channels created. Its again cloning the configurations without data in SharePoint Online. Data will be migrated as part of SharePoint data migration using Mover.
Since we have exported the teams data earlier, The same dump can be used with some minor adjustments like user UPN. Here is a sample script which will help to get the teams and team channels cloned as per the export files made from source tenant.
In my experience, Teams is bit tricky and sometimes needs some time to get settled after creation. For example, If the script is trying to create a team "Finance" and a private channel "PayRoll" with in Finance Team, Sometimes the channel creation fails if tried to create the channel immediately after creating the Finance Team. Keeping this in mind, the script is have a sleep of 10 seconds, which may not be sufficient. If so, rerun the script again after few minutes so that failed sections will get successfully completed.
Another important point on Teams PowerShell module. The current version of Teams PowerShell Module is 3.2.1. In case if some commandlet is not working as expected with 3.2.1, Try with 3.2.2 which is in public preview now.
If (Test-Path "C:\GoDaddyTenant\Export\Teams\TeamsDetails.CSV" -IsValid)
    {
    Connect-MicrosoftTeams
    Connect-AzureAD
    $TeamsDetails = Import-Csv -Path "C:\GoDaddyTenant\Export\Teams\TeamsDetails.CSV"
    $TeamChannelsDetails = Import-Csv -Path "C:\GoDaddyTenant\Export\Teams\TeamChannelDetails.csv"
    Foreach($TDetails in $TeamsDetails)
        {
        Write-Host "Creating Teams " $TDetails.DisplayName
        [bool]$TDetails.Archived = $TDetails.Archived
        [bool]$TDetails.AllowStickersAndMemes = $TDetails.AllowStickersAndMemes
        [bool]$TDetails.AllowCustomMemes = $TDetails.AllowCustomMemes
        [bool]$TDetails.AllowGiphy = $TDetails.AllowGiphy
        [bool]$TDetails.AllowGuestCreateUpdateChannels = $TDetails.AllowGuestCreateUpdateChannels
        [bool]$TDetails.AllowGuestDeleteChannels = $TDetails.AllowGuestDeleteChannels
        [bool]$TDetails.AllowCreateUpdateChannels = $TDetails.AllowCreateUpdateChannels
        [bool]$TDetails.AllowCreatePrivateChannels = $TDetails.AllowCreatePrivateChannels
        [bool]$TDetails.AllowDeleteChannels = $TDetails.AllowDeleteChannels
        [bool]$TDetails.AllowAddRemoveApps = $TDetails.AllowAddRemoveApps
        [bool]$TDetails.AllowCreateUpdateRemoveTabs = $TDetails.AllowCreateUpdateRemoveTabs
        [bool]$TDetails.AllowCreateUpdateRemoveConnectors = $TDetails.AllowCreateUpdateRemoveConnectors
        [bool]$TDetails.AllowUserEditMessages = $TDetails.AllowUserEditMessages
        [bool]$TDetails.AllowUserDeleteMessages = $TDetails.AllowUserDeleteMessages
        [bool]$TDetails.AllowOwnerDeleteMessages = $TDetails.AllowOwnerDeleteMessages
        [bool]$TDetails.AllowTeamMentions = $TDetails.AllowTeamMentions
        [bool]$TDetails.AllowChannelMentions = $TDetails.AllowChannelMentions
        [bool]$TDetails.ShowInTeamsSearchAndSuggestions = $TDetails.ShowInTeamsSearchAndSuggestions
        [bool]$TDetails.ShowInTeamsSearchAndSuggestions = $TDetails.ShowInTeamsSearchAndSuggestions
        New-Team -DisplayName $TDetails.DisplayName -Description $TDetails.Description -MailNickName $TDetails.MailNickName -Visibility $TDetails.Visibility -GiphyContentRating $TDetails.GiphyContentRating -AllowGiphy $TDetails.AllowGiphy -AllowStickersAndMemes $TDetails.AllowStickersAndMemes -AllowCustomMemes $TDetails.AllowCustomMemes -AllowGuestCreateUpdateChannels $TDetails.AllowGuestCreateUpdateChannels -AllowGuestDeleteChannels $TDetails.AllowGuestDeleteChannels -AllowCreateUpdateChannels $TDetails.AllowCreateUpdateChannels -AllowDeleteChannels $TDetails.AllowDeleteChannels -AllowAddRemoveApps $TDetails.AllowAddRemoveApps -AllowCreateUpdateRemoveTabs $TDetails.AllowCreateUpdateRemoveTabs -AllowCreateUpdateRemoveConnectors $TDetails.AllowCreateUpdateRemoveConnectors -AllowUserEditMessages $TDetails.AllowUserEditMessages -AllowUserDeleteMessages  $TDetails.AllowUserDeleteMessages -AllowOwnerDeleteMessages $TDetails.AllowOwnerDeleteMessages -AllowTeamMentions $TDetails.AllowTeamMentions -AllowChannelMentions $TDetails.AllowChannelMentions -ShowInTeamsSearchAndSuggestions $TDetails.ShowInTeamsSearchAndSuggestions
        Start-Sleep -Seconds 10
        }
    Write-Host "Proceeding with Team Channel Creation...." -ForegroundColor Yellow
    $TeamsChannelCount = $TeamChannelsDetails.length
    For ($j = 0; $j -lt  $TeamsChannelCount; $j++)
        {
        If ($TeamChannelsDetails.DisplayName[$j]  -ne "General")
            {
            Write-Host Creating Teams Channel $TeamChannelsDetails.DisplayName[$j] inside $TeamChannelsDetails.TeamName[$j]
            $TargetGroupID = Get-Team -DisplayName $TeamChannelsDetails.TeamName[$j] |Where-Object {$_.DisplayName -eq $TeamChannelsDetails.TeamName[$j]}
            If ($TargetGroupID -ne $null)
                {
                New-TeamChannel -GroupId $TargetGroupID.GroupID -DisplayName $TeamChannelsDetails.DisplayName[$j] -Description $TeamChannelsDetails.Description[$j] -MembershipType $TeamChannelsDetails.MembershipType[$j]
                }
            Else
                {
                Write-Host Group ID Missing. Please check if the parent Team was created successfully. If the Team was created successfully, Please re-run the script after some time
                }
            }
        }
    Disconnect-MicrosoftTeams
    }
Else
    {
    Write-Host Input File Missing. Please run Teams Export Script to generate an input file with all required data from Source Tenant.
    }
Once Teams and Teams Channel creation is successful, Give few hours and start with updating the permissions. At this point, Setting ownership of private channel using Add-TeamChannelUser commandlet is having some bug. However, membership is getting added as expected with MicrosoftTeams module 3.2.2 which is in public preview now. This commandlet was in the preview from last few version however not mature yet :).
Here is a sample script which can help to clone the Team/Team Channel (Private Channels) permissions.
#Update SourceDomainName & DestinationOnMicrosoftDomainName first.
$SourceDomainName = "YourDomain.com"
$DestinationOnMicrosoftDomain = "yourdomain.onmicrosoft.com"


If (Test-Path "C:\GoDaddyTenant\Export\Teams\TeamsDetails.CSV" -IsValid)
    {
    Connect-MicrosoftTeams -verbose
    Connect-AzureAD -Verbose
    $TeamsDetails = Import-Csv -Path "C:\GoDaddyTenant\Export\Teams\TeamsDetails.CSV"
    $TeamChannelsDetails = Import-Csv -Path "C:\GoDaddyTenant\Export\Teams\TeamChannelDetails.csv"
    Foreach($TDetails in $TeamsDetails)
        {
        [string] $TeamUserPermissionFile = "C:\GoDaddyTenant\Export\Teams\Permissions\TeamPermission_"+$TDetails.GroupId+".csv"
        $TargetGroupID = Get-Team -DisplayName $TDetails.DisplayName |Where-Object {$_.DisplayName -eq $TDetails.DisplayName}
        $Permissions = Import-Csv $TeamUserPermissionFile
        Foreach($UserPermission in $Permissions)
            {
            Write-Host Entering Permission assignment on $TDetails.DisplayName for $UserPermission.User
            $uName = $UserPermission.User
            If ($uName -match $SourceDomainName)
                {
                $TargetUser = $Uname -replace  $SourceDomainName, $DestinationOnMicrosoftDomain
                Write-Host $uName adjusted to $TargetUser -ForegroundColor Green
                Get-AzureADUser -SearchString $TargetUser
                IF(Get-AzureADUser -SearchString $TargetUser -ErrorAction SilentlyContinue)
                    {
                    Write-Host Adding $TargetUser as $UserPermission.Role
                    Add-TeamUser -GroupId $TargetGroupID.GroupID -User $TargetUser -Role $UserPermission.Role
                    }
                Else
                    {
                    Write-Host "Account missing in Azure AD - " $TargetUser
                    }
                }
            }
        }
    Write-Host "Proceeding with Team Channel permission assignment...." -ForegroundColor Yellow
    $TeamsChannelCount = $TeamChannelsDetails.length
    For ($j = 0; $j -lt  $TeamsChannelCount; $j++)
        {
        If ($TeamChannelsDetails.DisplayName[$j]  -ne "General")
            {
            Write-Host Creating Teams Cahnnel $TeamChannelsDetails.DisplayName[$j] inside $TeamChannelsDetails.TeamName[$j]
            $TargetGroupID = Get-Team -DisplayName $TeamChannelsDetails.TeamName[$j] |Where-Object {$_.DisplayName -eq $TeamChannelsDetails.TeamName[$j]}
            If ($TeamChannelsDetails.MembershipType[$j] -match "Private")
                {
                [string] $TeamPriviateChannelPermissionFile = "C:\GoDaddyTenant\Export\Teams\Permissions\TeamsPrivateChannelPermission_"+$TeamChannelsDetails.TeamGroupID[$j]+"_"+$TeamChannelsDetails[$j].DisplayName+".csv"
                $PrivateChannelPermission = Import-CSV  $TeamPriviateChannelPermissionFile
                Foreach ($UserPermission in $PrivateChannelPermission)
                    {
                    If ($UserPermission.user -match $SourceDomainName)
                        {
                        $dTargetUser = $UserPermission.user -replace  $SourceDomainName, $DestinationOnMicrosoftDomain
                        Write-Host $UserPermission.user adjusted to $dTargetUser -ForegroundColor Green
                        Write-Host Adding $dTargetUser as a member in Priviate Group $TeamChannelsDetails.DisplayName[$j]
                        Add-TeamChannelUser -GroupId $TargetGroupID.GroupID -DisplayName $TeamChannelsDetails.DisplayName[$j] -User $dTargetUser
                        If ($UserPermission.Role -eq "Owner")
                            {
                            Write-Host Elevating $dTargetUser as $UserPermission.Role in Priviate Group $TeamChannelsDetails.DisplayName[$j]
                            Start-Sleep -Seconds 30
                            Add-TeamChannelUser -GroupId $TargetGroupID.GroupID -DisplayName $TeamChannelsDetails.DisplayName[$j] -User $dTargetUser -Role Owner
                            }
                        }
                    }
                }
            }
        }
    Disconnect-MicrosoftTeams
    Disconnect-AzureAd
    }
Else
{
Write-Host InputFile Missing. Please run Teams Export Script to generate an input file with all required data from Source Tenant.
}
With this, Teams and Teams Channels are good to go.
During this phase, All user objects who are part of the migrations scope needs a corresponding user object on the target tenant. Since we have exported the user dump from GoDaddy tenant, User Objects can be created newly on the target tenant keeping the required attributes. However, few key attributes needs to be adjusted with the target enviornment.
For example, UPN in GoDaddy tenant which is currently used might be "YourDomain.com". However, the same domain name cannot be made available on the target tenant at this stage. Hence, the approach we should take is to adjust the user principal name with the default onmicrosoft.com domain provided by Microsoft. UPN will be corrected on the cutover day and until we cross that time, the interim UPN can be used.
If users are having thumbnails, The exported files will be available in .\Thumbs folder. However, import may fail if the file size is above 100KB. In my experience, its better to keep the thumb size below 80KB to be on safer side.
Here is a sample script which can import AzureAD User Objects from the exported data. Note that user object in this context is only the actual users with a valid UPN pointing to the production domain. Guest users are not getting recreated through scripts, rather they need a new invite from the new tenant. While accepting the invite, New guest user account will get created. We will discuss that along with teams.
<# Update this section first #>
[string]$OnMicrosoftdomain = "youronmicrosoftdomain.onmicrosoft.com"
[string] $productiondomain = "*yourproductiondomain.com"
$PasswordProfile = New-Object -TypeName Microsoft.Open.AzureAD.Model.PasswordProfile
$PasswordProfile.Password = "y0uRP@ww0rd"


IF ((Test-Path -Path "C:\GoDaddyTenant\Export\AADUsers\AllUsers.CSV") -like "True")
    {
    [array] $AllUsers = Import-CSV "C:\GoDaddyTenant\Export\AADUsers\AllUsers.CSV"
    Connect-AzureAD
    $Len = $AllUsers.Count
    For ($i = 0; $i -lt $Len ; $i++)
        {
        IF ($AllUsers.UserType[$i] -eq "Member" -and $AllUsers.UserPrincipalName[$i] -match $productiondomain)
            {
            [array] $UDetails = $AllUsers[$i]
            Write-Host Processing User - $UDetails.UserPrincipalName
            $NewUPN = $UDetails.UserPrincipalName.Replace($productiondomain,$OnMicrosoftdomain)
            Write-Host UPN adjusted as $NewUPN -ForegroundColor Yellow
            [string] $ThumbName = $UDetails.UserPrincipalName.Split("@")[0]+"*"
            [string] $ThumbLocation = Get-ChildItem -Path "C:\GoDaddyTenant\Export\AADUsers\Thumbs" -Filter $ThumbName -ErrorAction SilentlyContinue|Select-Object FullName -ExpandProperty FullName
            IF (Get-AzureADUser -SearchString $NewUPN -ErrorAction SilentlyContinue)
                {
                Write-Host $NewUPN - User Object Already Exist with the UPN $NewUPN. Skipping User Creation.... -ForegroundColor Red
                }
            Else
                {
                New-AzureADUser -AccountEnabled $False -DisplayName $UDetails.DisplayName -GivenName $UDetails.GivenName  -MailNickName $UDetails.MailNickName  -PreferredLanguage "en-US" -UsageLocation "US" -UserType "Member" -UserPrincipalName $NewUPN -PasswordProfile $PasswordProfile -Country "US"
                }
            $oID = Get-AzureADUser -SearchString $NewUPN -ErrorAction SilentlyContinue
            IF (Test-Path $ThumbLocation)
                {
                $ThumbSize = (Get-ChildItem -LiteralPath $ThumbLocation).Length/1KB
                If ($ThumbSize -lt 80)
                    {
                    Set-AzureADUserThumbnailPhoto -ObjectId $oID.ObjectID -FilePath $ThumbLocation -ErrorAction SilentlyContinue
                    }
                Else
                    {
                    Write-Host Thumb Size is $ThumbSize KB. Please reduce the file size below 80KB -ForegroundColor Red
                    }
                }
            Write-Host $NewUPN - Processing completed -ForegroundColor Green
            }
        }

        Write-Host "Updating Manager Attributes of Users"
        [array] $UserManagerArray = Import-CSV "C:\GoDaddyTenant\Export\AADUsers\UserManager.CSV"
        $Len = $UserManagerArray.Length
        For ($j = 0; $j -lt $Len ; $j++)
            {
            $TargetUser = $UserManagerArray.User[$j].Replace($productiondomain,$OnMicrosoftdomain)
            $TargetUserManager = $UserManagerArray.Manager[$j].Replace($productiondomain,$OnMicrosoftdomain)
            Write-Host Updating manager attribute of $TargetUser to $TargetUserManager -ForegroundColor Yellow
            $UseroID = (Get-AzureADUser -SearchString $TargetUser).ObjectID
            $ManageroID = (Get-AzureADUser -SearchString $TargetUserManager).ObjectID
            Set-AzureADUserManager -ObjectId $UseroID -RefObjectId $ManageroID
            }
    }
Else
    {
    Write-Host Input File Missing at "C:\GoDaddyTenant\Export\AADUsers\AllUsers.CSV". Use the data Collection Script to export the Azure AD User details. -ForegroundColor Red
    }
Disconnect-AzureAD
The next phase is to prepare for the migration. Preparation phase has the below sub sections.
Preparing the Target Tenant
Preparing for Data Migration
Preparing for Cutover
Lets have a closer look on each of them.
Preparing the Target Tenant
Once the new tenant is provisioned and the migration team has access to manage the new tenant, The initial preparation activities can be started. The sequence of the activities is important and has an implication if we take a wrong route.
Configure the basic tenant settings
Onboard User Objects (Not guest users, just the member users)
Provision Teams and Teams channels
Provision the Unified Groups
Provision Distribution Groups and Security Groups
Provision Dynamic Distribution Groups
Provision SharePoint sites, which are not linked with Teams or Unified Groups
The logic behind sequencing the activities is to have the right level of integrations between M365 Groups, Teams and SharePoint. Once users are provisioned, Teams can be be created and grant membership. By this way, the M365 Groups and SharePoint sites will get created. In the same way, Teams Standard Channels and Teams Private Channels can be created. One Private Channels, Update the membership too. With that, SharePoint site for the private channels will get created and the permissions are taken care. M365 groups without Teams Integration can be created next so that the backend SharePoint sites will get provisioned. With that, we are almost done with the pieces which has mutual integration. The left over Groups can be created now and update the membership accordingly.
Configuring the basics tenant settings includes creating a break glass account, enabling MFA for administrators and having required licenses ready to move forward. This is not having any dependency with the current configuration on GoDaddy Tenant. So identify the best practices and apply them based on your analysis.
As part of the assessment phase, Its required to collect the details from source tenant. Here is a quick guide on how we can export the required details from source tenant quickly.
Azure ActiveDirectory
User Objects
Use Get-AzuerADUser for exporting User Details
Use Get-AzureADUserManager for exporting user manager
Use Get-AzureADUserThumbnails for exporting user thumbnails
Here is a sample script which can be used for exporting the user details. As a prerequisite, Please install AzureAD module before executing the script.
Use Get-AzureADGroupMember for exporting group members
Use Get-AzureADGroupOwner for exporting group owners
Here is a sample script which can be used for exporting the group details. As a prerequisite, Please install AzureAD module before executing the script.
Get-AzureADDevice to export Azure AD registered / AAD joined devices
Here is a sample script which can be used for exporting the device details. As a prerequisite, Please install AzureAD module before executing the oneliner.
Use Get-MailContact for exporting all mail contacts
Use Get-Group for exporting all distribution groups
Use Get-UnifiedGroup for exporting all unified groups
Use Get-DynamicDistributionGroup for exporting Dynamic Distribution Groups
Here is a sample script which can be used for exporting the user details. As a prerequisite, Please install ExchangeOnline module before executing the script.
Use Get-TeamChannelUser for exporting private channel users
Here is a sample script which can be used for exporting the user details. As a prerequisite, Please install MicrosoftTeams module before executing the script.